[]对游戏中各种控件字体样式使用“白鹭style”样式表
1.首先定义一个字体样式类和接口。
字体样式接口。
ITextFormat.ts
然后是一个字体样式类:
TextFormat.ts
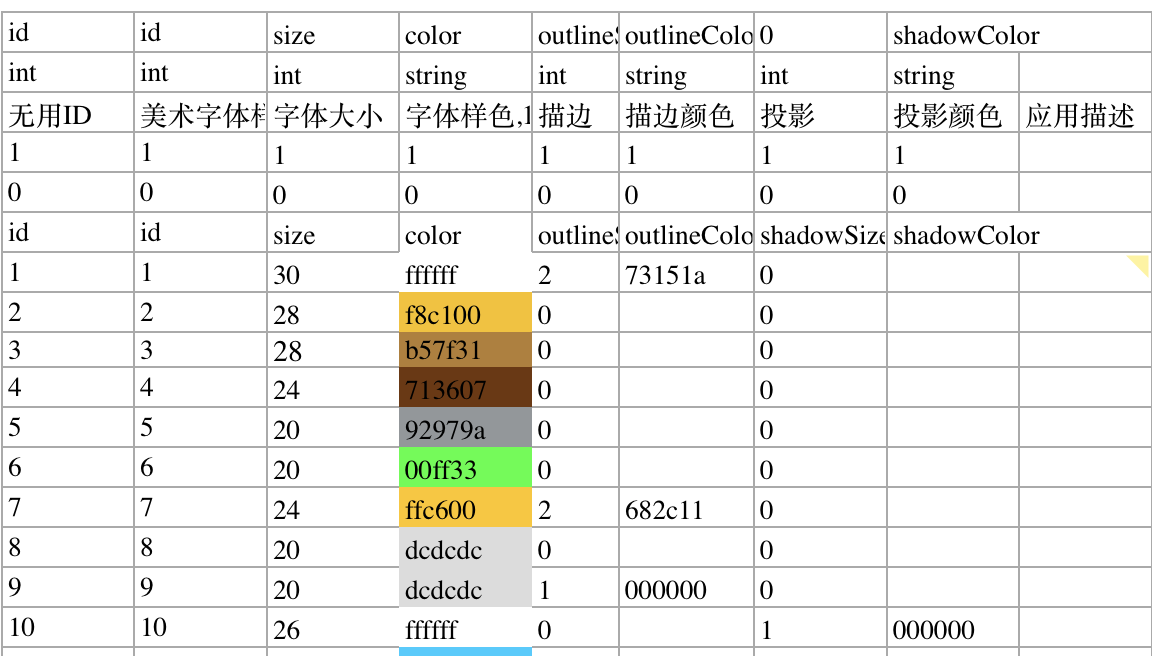
下面是一个简单的表格:
3.想办法吧这个excel表格给转成json。其中每一条样式转换成的json对象的key必须是我们上面定义的类或者接口中存在的字段。方便后面直接从obj映射到类。(这里利用了ts是名义接口这个特性)。
excel导出成json,方法很多,这里我是用node脚本转的,用到了node-xlsx这个第三方模块
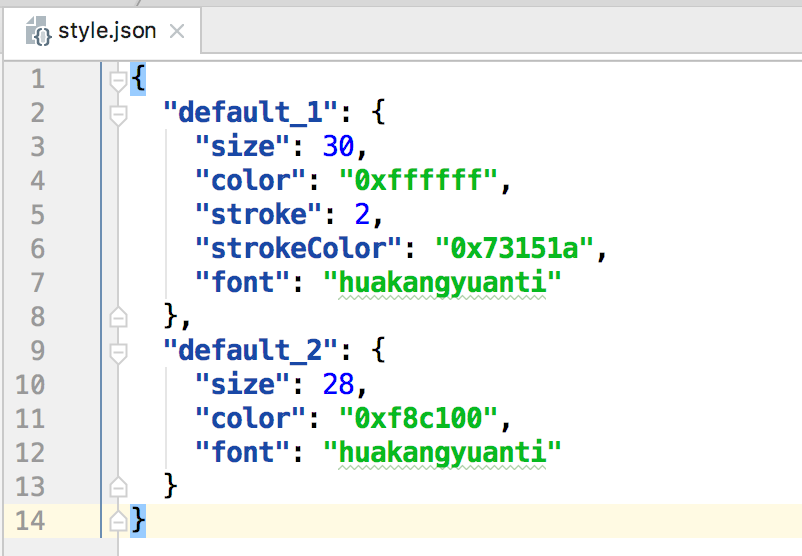
下图是我转换出来的style.json中的一部分。每条字体样式配置有一个独一无二的key.这个很重要,后面代码中需要用到这个key。
我这里excel中id为1的,转换出来之后就是default_1,……依次类推。
4.吧style.json放入游戏预加载列表中。
5.写一个样式管理器,统一处理样式相关操作。下面是我的代码:
StyleManager.ts
(这里其实就是吧style.json中的样式配置,根据控件自身的设置文字样式的属性进行逐条赋值。
6.配置有了,样式管理器也有了,怎么应用到控件上面去?下面是关键:
需要稍微看一下底层的源码,这里给出我的实现:
在你的入口类中添加这个函数,然后尽可能早的调用它。这里的代码看起来很奇怪。比如为什么要写成Laya["getset"],而不写成Laya.getset
呢?是因为ts的LayaAir.d.ts中没公开这个方法,但其实js源码中是有的。我这里不想去改LayaAir.d.ts这个文件。所以用了中括号语法。ts最终编译成了js,实际执行时毫无问题的。
7.实际ui界面中用法如下:
在你自己的ui界面中,重写initialize()方法。(这个是Component基类的方法。这里是可以确保控件已经创建完毕的。)
要想使用这个fontStyle属性。首先得保证在changeEngineDefault方法中有对应控件的处理。
其次得在StyleManager中写对应控件自己的样式赋值方法。
题外话:
1.如果你不经常升级引擎。其实是可以去手动改引擎源码。增加fontStyle(或者其他你喜欢的名字)这个属性。然后修改一下LayaAir.d.ts,这样就不用蛋疼的使用中括号语法,直接一路点点点,编辑器还有提示。
2.不知能不能去扩展编辑器,给相应控件增加一个选样式的combobox,就跟白鹭一样(这个我暂时没去研究)。
3.上面代码可能是有bug的。自己酌情修改哦~我也刚入laya
4.统一管理字体样式还是很有必要的。特别是美术经常更换界面底框的风格,原来的字体颜色方案很大可能都不再适用。(我就是吃过亏的),使用这种方法。可以很大程度把这种工作量推锅给美术,他们只要修改样式表。我们更新一下样式表就OK了
字体样式接口。
ITextFormat.ts
/**

 * @User: liuliqianxiao

 * @Date: 2017/12/25

 * @Time: 下午3:07

 * @Desc: 这家伙很懒,什么都没留下……

 **/

interface ITextFormat {

    /**

     * 背景色

     */

    bgColor?: string;


    /**

     * 是否加粗

     */

    bold?: number;


    /**

     * 文本框背景色

     */

    borderColor?: string;


    /**

     * 文本颜色

     */

    color?: string;


    /**

     * 字体

     */

    font?: string;


    /**

     * 字体大小

     */

    fontSize?: number;


    /**

     * 是否为斜体

     */

    italic?: number;


    /**

     * 行间距

     */

    leading?: number;


    /**

     * 描边宽度

     */

    stroke?: number;


    /**

     * 描边颜色

     */

    strokeColor?: string;


    /**

     * 下划线

     */

    underline?: number;


    /**

     * 下划线颜色

     */

    underlineColor?:string;


    /**

     * 是否自动换行

     */

    wordWrap?: number;


    /**

     * 默认提示的文本颜色(输入框有这个玩意儿)

     */

    promptColor?:string;

}
然后是一个字体样式类:
TextFormat.ts
/**这些字段就是Label控件类设置样式的相关属性。这里我只选取了我需要的。还有那些align等属性,可以根据自己需要定义。这里只是抛砖引玉……2.设计一个excel表格。让美术能填写他们设计界面用到的样式。然后美术发给程序的界预览图中要明确表明每个文本用到的字体样式编号。
* @User: liuliqianxiao
* @Date: 2017/12/25
* @Time: 下午3:52
* @Desc: 字体样式
**/
class TextFormat implements ITextFormat {
/**
* 背景色
*/
bgColor: string;
/**
* 是否加粗
*/
bold: number;
/**
* 文本框背景色
*/
borderColor: string;
/**
* 文本颜色
*/
color: string;
/**
* 字体
*/
font: string;
/**
* 字体大小
*/
fontSize: number;
/**
* 是否为斜体
*/
italic: number;
/**
* 行间距
*/
leading: number;
/**
* 描边宽度
*/
stroke: number;
/**
* 描边颜色
*/
strokeColor: string;
/**
* 下划线
*/
underline: number;
/**
* 下划线颜色
*/
underlineColor:string;
/**
* 是否自动换行
*/
wordWrap: number;
/**
* 默认提示的文本颜色(输入框有这个玩意儿)
*/
promptColor:string;
constructor() {
}
}
下面是一个简单的表格:
3.想办法吧这个excel表格给转成json。其中每一条样式转换成的json对象的key必须是我们上面定义的类或者接口中存在的字段。方便后面直接从obj映射到类。(这里利用了ts是名义接口这个特性)。
excel导出成json,方法很多,这里我是用node脚本转的,用到了node-xlsx这个第三方模块
下图是我转换出来的style.json中的一部分。每条字体样式配置有一个独一无二的key.这个很重要,后面代码中需要用到这个key。
我这里excel中id为1的,转换出来之后就是default_1,……依次类推。
4.吧style.json放入游戏预加载列表中。
5.写一个样式管理器,统一处理样式相关操作。下面是我的代码:
StyleManager.ts
/**这里我暂时就只处理了Label,Button,TextInput上的文本样式赋值。如果有需要控制其他控件,看完本篇之后自行实现。
* @User: liuliqianxiao
* @Date: 2017/12/25
* @Time: 下午3:07
* @Desc: 字体样式管理器
**/
class StyleManager {
private static _instance: StyleManager;
private _styleMap: Object;//字体样式映射
static get instance(): StyleManager {
if (!this._instance) {
this._instance = new StyleManager();
}
return this._instance;
}
constructor() {
}
/**
* 解析字体样式
* @param {Object} obj
*/
parseStyle(obj: Object) {
this._styleMap = obj;
}
/**
* 根据key找到字体样式的具体配置
* @param {string} id
* @returns {ITextFormat}
*/
getStyleById(id: string): ITextFormat {
return this._styleMap[id];
}
/**
* 给文本赋值样式
* @param {Laya.Label} label
* @param {ITextFormat} styleObj
*/
assignLabelFontStyle(label: Laya.Label, style: string | ITextFormat): void {
let keys: Array<string> = ["bgColor", "bold", "borderColor", "color", "font", "fontSize", "italic", "leading",
"stroke", "strokeColor", "underline", "underlineColor", "worldWrap"];
let styleObj: ITextFormat;
if (typeof style === "string") {
styleObj = this.getStyleById(style as string);
} else {
styleObj = style as ITextFormat;
}
for (let key of keys) {
if (styleObj[key] != undefined) {
label[key] = styleObj[key];
}
}
}
/**
* 给按钮上文本样式赋值
* @param {Laya.Button} button
* @param {ITextFormat} styleObj
*/
assignButtonFontStyle(button: Laya.Button, style: string | ITextFormat): void {
let keyMap: Object = {
bold: "labelBold",
color: "labelColors",
font: "labelFont",
fontSize: "labelSize",
stroke: "labelStroke",
strokeColor: "labelStrokeColor",
};
let disabledColor: string = "#AAAAAA";//按钮变灰色时字体颜色
let styleObj: ITextFormat;
if (typeof style === "string") {
styleObj = this.getStyleById(style as string);
} else {
styleObj = style as ITextFormat;
}
if (styleObj.bold) {
button[keyMap["bold"]] = styleObj.bold;
}
if (styleObj.font) {
button[keyMap["font"]] = styleObj.font;
}
if (styleObj.fontSize) {
button[keyMap["fontSize"]] = styleObj.fontSize;
}
if (styleObj.stroke) {
button[keyMap["stroke"]] = styleObj.stroke;
}
//按钮颜色和描边颜色要注意。是要分upColor,overColor,downColor,disableColor
if (styleObj.color) {
let tmpColors: Array<string>;
if (styleObj.color.indexOf(",") != -1) {
button[keyMap["color"]] = styleObj.color;
} else {
tmpColors = [styleObj.color, styleObj.color, styleObj.color, disabledColor];
button[keyMap["color"]] = tmpColors.join(",");
}
}
if (styleObj.strokeColor) {
let tmpColors: Array<string>;
if (styleObj.strokeColor.indexOf(",") != -1) {
button[keyMap["strokeColor"]] = styleObj.strokeColor;
} else {
tmpColors = [styleObj.strokeColor, styleObj.strokeColor, styleObj.strokeColor, disabledColor];
button[keyMap["strokeColor"]] = tmpColors.join(",");
}
}
}
/**
* 输入框样式赋值
* @param {Laya.TextInput} input
* @param {ITextFormat} styleObj
*/
assignTextInputFontStyle(input: Laya.TextInput, style: string | ITextFormat): void {
let styleObj: ITextFormat;
if (typeof style === "string") {
styleObj = this.getStyleById(style as string);
} else {
styleObj = style as ITextFormat;
}
this.assignLabelFontStyle(input, styleObj);
//如果没有特殊设置默认提示文字的颜色,就和设置的输入文本颜色保持一致
if (!styleObj.promptColor) {
input.promptColor = styleObj.color;
} else {
input.promptColor = styleObj.promptColor;
}
}
}
(这里其实就是吧style.json中的样式配置,根据控件自身的设置文字样式的属性进行逐条赋值。
6.配置有了,样式管理器也有了,怎么应用到控件上面去?下面是关键:
需要稍微看一下底层的源码,这里给出我的实现:
/**这个方法里面的第一大块代码请忽视(那个是实现引擎没加载一个子项目都能触发回调,如果有设置单项回调函数的话)
* 更改引擎默认行为
*/
private changeEngineDefault(): void {
//每一项加载内容加载完成均可以设置一个回调
Laya.LoaderManager.prototype["_loadAssets"] = function (arr, complete, progress, type, priority, cache, group) {
(priority === void 0) && (priority = 1);
(cache === void 0) && (cache = true);
var itemCount = arr.length;
var loadedCount = 0;
var totalSize = 0;
var items = ;
var success = true;
for (var i = 0; i < itemCount; i++) {
var item = arr[i];
if ((typeof item == 'string')) item = {url: item, type: type, size: 1, priority: priority};
if (!item.size) item.size = 1;
item.progress = 0;
totalSize += item.size;
items.push(item);
var progressHandler = progress ? Laya.Handler.create(null, loadProgress, [item], false) : null;
var completeHandler = (complete || progress) ? Laya.Handler.create(null, loadComplete, [item]) : null;
this.load(item.url, completeHandler, progressHandler, item.type, item.priority || 1, cache, item.group || group);
}
function loadComplete(item, content) {
loadedCount++;
item.progress = 1;
//在此处添加每个小项加载完成之后的回调函数
if (item.onComplete && item.onComplete instanceof Laya.Handler) {
item.onComplete.runWith(content);
}
if (!content) success = false;
if (loadedCount === itemCount && complete) {
complete.runWith(success);
}
}
function loadProgress(item, value) {
if (progress != null) {
item.progress = value;
var num = 0;
for (var j = 0; j < items.length; j++) {
var item1 = items[j];
num += item1.size * item1.progress;
}
;
var v = num / totalSize;
progress.runWith(v);
}
}
return this;
};
//可以用style样式来控制各种控件的字体设置
Laya.Component.prototype["textFormatObj"] = null;//给Component基类定义一个textFormatObj属性
//Label字体样式处理
Laya["getset"](false, Laya.Label.prototype, "fontStyle", function () {
return this["textFormatObj"];
}, function (styleObj: string | ITextFormat) {
if (this["textFormatObj"]!= styleObj) {
this["textFormatObj"] = styleObj;
StyleManager.instance.assignLabelFontStyle(this, styleObj);
}
});
//按钮字体样式处理
Laya["getset"](false, Laya.Button.prototype, "fontStyle", function () {
return this["textFormatObj"];
}, function (styleObj: string | ITextFormat) {
if (this["textFormatObj"] != styleObj) {
this["textFormatObj"] = styleObj;
StyleManager.instance.assignButtonFontStyle(this, styleObj);
}
});
//输入框文本样式设置处理
Laya["getset"](false, Laya.TextInput.prototype, "fontStyle", function () {
return this["textFormatObj"];
}, function (styleObj: string | ITextFormat) {
if (this["textFormatObj"] != styleObj) {
this["textFormatObj"] = styleObj;
StyleManager.instance.assignTextInputFontStyle(this, styleObj);
}
});
}[/i]
在你的入口类中添加这个函数,然后尽可能早的调用它。这里的代码看起来很奇怪。比如为什么要写成Laya["getset"],而不写成Laya.getset
呢?是因为ts的LayaAir.d.ts中没公开这个方法,但其实js源码中是有的。我这里不想去改LayaAir.d.ts这个文件。所以用了中括号语法。ts最终编译成了js,实际执行时毫无问题的。
7.实际ui界面中用法如下:
在你自己的ui界面中,重写initialize()方法。(这个是Component基类的方法。这里是可以确保控件已经创建完毕的。)
[i]protected initialize(): void {这里为什么还是用中括号语法,原因同第6条最后所述。
super.initialize();
this._txUserName["fontStyle"] = "default_1";
// let tf: TextFormat = new TextFormat();
// tf.color = "#ffff00";
// tf.fontSize = 30;
// tf.stroke = 2;
// tf.strokeColor = "#000000";
// this._txUserName["fontStyle"] = tf;
}[/i]
要想使用这个fontStyle属性。首先得保证在changeEngineDefault方法中有对应控件的处理。
其次得在StyleManager中写对应控件自己的样式赋值方法。
题外话:
1.如果你不经常升级引擎。其实是可以去手动改引擎源码。增加fontStyle(或者其他你喜欢的名字)这个属性。然后修改一下LayaAir.d.ts,这样就不用蛋疼的使用中括号语法,直接一路点点点,编辑器还有提示。
2.不知能不能去扩展编辑器,给相应控件增加一个选样式的combobox,就跟白鹭一样(这个我暂时没去研究)。
3.上面代码可能是有bug的。自己酌情修改哦~我也刚入laya
4.统一管理字体样式还是很有必要的。特别是美术经常更换界面底框的风格,原来的字体颜色方案很大可能都不再适用。(我就是吃过亏的),使用这种方法。可以很大程度把这种工作量推锅给美术,他们只要修改样式表。我们更新一下样式表就OK了
没有找到相关结果
已邀请:
要回复问题请先登录


2 个回复
Monica - 知识达人
赞同来自:
as_luck
赞同来自: